Tuesday, 5 September 2017

Single Responsibility Principle (SRP)

According to SRP a class should take one responsibility and there should be one reason to change that class. When a class has more than one responsibility, there are also more triggers and reasons to change that class. A responsibility is the same as “a reason for change” in this context.

  •       Base on cohesion.
  •     A class should do only one thing.
  •      Separation of concerns.


For real world example, such as famous Swiss knife. If one of them needs to be changed the whole set needs to be disturbed.


But if those items separated its simple, easy to maintain and one change does not affect the other. The same principle also applies to classes and objects as SRP in software architecture.


For Coding Example ,Check with this Employee class 


namespace SRP
{
    public class Employee
    {
        public int EmployeeId { get; set; }
        public string EmployeeName { get; set; }
        public bool InsertEmployee(Employee employee)
        {
            // Insert into employee table.
        }
        public bool DeleteEmployee(int employeeId)
        {
            // Delete the Employee in employee table.
        }
        public void GenerateReport(Employee employee)
        {
            // Report generation with employee data
        }
    }
}

Employee” class is taking 2 responsibilities,
  1. Take responsibility of employee database operation
  2. Generate employee report.
There are two reasons to change this class. That is not good approach of software Engineering.

According to SRP, one class should take one responsibility so we should write one different class for
report generation and if any change in report generation should not affect the ‘Employee” class.

public class ReportGeneration
    {
       
        public void GenerateReport(Employee employee)
        {
            // Report reneration with employee data.
        }
    }

Monday, 4 September 2017

String Pool in C#

The string pool is a table that contains a single reference to each unique literal string declared in your application which use by the Common Language Runtime (CLR) to minimize string storage requirements.


string string1 = "xyz";
string string2 = "xyz";


According to above code string1 and string2 assign to same literal string (“xyz”). The string pool contains a single reference for these unique literal strings.

To confirm if the same reference has been assigned we can check for the HashCode for both the string object.
Code and Output as Follow.


Console.WriteLine("Hash Code of string1- " + string1.GetHashCode());
Console.WriteLine("Hash Code of string2- " + string2.GetHashCode());

Sunday, 3 September 2017

What is the Difference between DDL, DML, DCL and TCL Statements in SQL

SQL language is divided into four types of primary language statements.

Follows mention regarding the four main categories of SQL statements:


1. DDL (Data Definition Language)
2. DML (Data Manipulation Language)
3. DCL (Data Control Language)
4. TCL (Transaction Control Language)

DDL (Data Definition Language)

DDL statements are used to define data structures or Schema.
For Example -
CREATE – create a new Table, database, schema
ALTER – alter existing table, column description
DROP – delete existing objects from database


DML (Data Manipulation Language)

DML statements are used to manipulate data itself.
For Example -
SELECT – select records from a table
INSERT – insert new records
UPDATE – update/Modify existing records
DELETE – delete existing records

DCL (Data Control Language)

DCL statements are used to control the level of access that users have on database objects.
For Example -
GRANT – allows users to read/write on certain database objects
REVOKE – keeps users from read/write permission on database objects

TCL (Transaction Control Language)

TCL statements are used to control and manage transactions to maintain the integrity of data within SQL statements.
For Example -
BEGIN Transaction – opens a transaction
COMMIT Transaction – commits a transaction
ROLLBACK Transaction – ROLLBACK a transaction in case of any error

Tuesday, 29 August 2017

What is the Difference between DELETE and TRUNCATE in MS-SQL Server

Blow mention the difference of  between DELETE and TRUNCATE  in MS-SQL Server.


1)   Command Type

       DELETE  -  DML(Data Manipulation Language )Command.
       TRUNCATE  - DDL (Data Definition Language)Command.
   
2) Role Back

      DELETE  - Can Role Back using Transactions.
      TRUNCATE  - Can not Role Back.

3) Identity  Reset

      DELETE  - Identity Column didn't Reset.
      TRUNCATE  - Identity Column Reset.

4) Lock

      DELETE  - Row lock ,each row is locked to Delete.
      TRUNCATE  - Table lock ,whole table is locked to remove all records.

5) Where Condition

       DELETE  - Support for Where Condition.
       TRUNCATE  - Didn't Support for Where Condition.

Sunday, 11 June 2017

What is the difference between an abstract method and a virtual method?


Abstract Method
  1. Abstract method is defined in only abstract class.
  2. Abstract method should contain only method definition (No Implementation).
  3. Abstract method must be override in the derived class.
Virtual Method
  1. Virtual methods may or may not override in the derived class (not mandatory).
  2. Virtual methods must have implementation along with definition of method.


follow mention the implementation 


public abstract class BaseClass{
     public abstract decimal GetSumAbstractMethod(decimal value1, decimal value2);
     public virtual decimal GetSumVirtualMethod1(decimal value1, decimal value2)
     {
            return value1 + value2;
     }
    public virtual decimal GetSumVirtualMethod2(decimal value1, decimal value2)
    {
            return value1 + value2;
    }
}
 public class DerivedClass : BaseClass{
   public override decimal GetSumAbstractMethod(decimal value1, decimal value2)
   {
            return value1 + value2;
   }
   public override decimal GetSumVirtualMethod2(decimal value1, decimal value2)
   {
            return (value1 + value2) *2 ;
   }
   public void ImplementationMethods()
   {
            DerivedClass derivedClass = new DerivedClass();
            derivedClass.GetSumAbstractMethod(1, 2);
            derivedClass.GetSumVirtualMethod1(1, 2);
            derivedClass.GetSumVirtualMethod2(1, 2);
   }
}


Thursday, 24 March 2016

How to Allow Non-Admin To Start And Stop System Services

Step 1 – Create the Console

Ø  Click Start > Run (or press WIN + R) and type “mmc.exe
Ø  This opens an empty Microsoft Management Console. Click File > Add/Remove Snap-in… (Ctrl+ M)
Ø  Scroll down the list of available Snap-ins and select Security Configuration and Analysis
Ø  Click Add
Ø  Next select Security Templates
Ø  Click Add
Ø  Click OK


  Step 2 – Create a blank Security Template

Ø  Right-click Security Templates from the console tree and select New Template Search Path.
Ø  Browse to C:\temp, or other local path, and click OK
Ø  Right-click C:\temp from the console tree and select New Template
Give the new template a name,
E.g. Windows Services. It doesn’t matter what you use.
Ø  The Description is optional but may be useful if you want to re-use it
Ø  Click OK and you will see the new template appear in the console


Step 3 – Create a Security Database

Ø Right-click Security Configuration and Analysis from the console tree and select Open Database
                      Ø Browse to C:\temp, or other local path, and type a name in the box
E.g. Security
Ø  Click OK. This creates an Security.sdb file that is used to apply the changes
Ø  An Import Template window appears.
Browse to C:\temp\ Windows Services.inf and select Open. This applies the template with all the local services to the database
Ø  If you get the error “The database you are attempting to open does not exist.” then you need to choose a different path i.e. on a local disk
Ø  Right-click Security Configuration and Analysis from the console tree and select Analyze Computer
Ø  Click OK to accept the default log file path
Ø  You will then be presented with something that looks very similar to the Group Policy Editor or Local Security Policy Console.


Step 4 Change Service Permissions

Ø  Double-Click System Services
Ø  Scroll down to find these 3 services which you need to change Service
Ø  Double-Click the service
Ø  Tick the box Define this policy in the database
Ø  Click the Edit Security button


Ø  Select or add user And Allow Full Control.
Ø  Click OK on the Service Properties to bring you back to the console
Ø  You’ll notice the Service now has an ‘x’ on it and Investigate message on the Permission column. This is because the new permissions we’ve chosen conflict with what is on the local computer.


Step 5 – Apply new Security Permissions

Ø  Right-click Security Configuration and Analysis from the console tree and select Configure Computer.
Ø  Click OK to accept the default log file path.
Ø  This will apply the new custom permissions to the local computer
Ø  You can now test it out on the server with the  account and test it works.


Sunday, 6 March 2016

How to force .NET Application to run as administrator on Windows

If we want application force to run as Administrator  on windows, how we can do that
following i have describe how we can do this for .Net application.


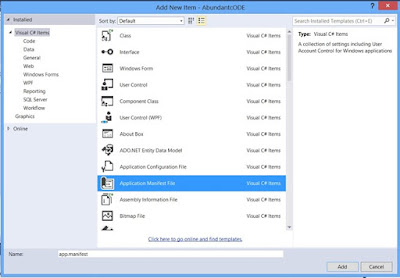
1. First we need to add a new Application Manifest file your .Net project.In the Project, Right click      on the solution and click “Add new Item” and then add Manifest file


2. Then need to change In  Manifest File, modify the <requestedExecutionLevel> to <requestedExecutionLevel level=”requireAdministrator” uiAccess=”false” />


Now  user starts the application, user will prompted with the UAC and on accepting the program will run the admini mode.


Single Responsibility Principle (SRP)